Bloggers love Pinterest!
![]()
Yes, I am a designer, but I am also a blogger at heart, too.
And the designer in me can’t help, but like to use customized images for all my blogging needs.
And yes I love social media, especially Pinterest.
Pinterest is the bread and butter of sharing for most bloggers. And no you don’t have to just be a crafty or foodie blogger for this.
Any images you put into a blog article is fair game for pinning on Pinterest to get your post extra exposure through this social media outlet.
And if you blog on either Wordpress or Blogger, then there are indeed social media share buttons (Pinterest included) on each post if you have set up your social sharing buttons for posts correctly.
However, if you have ever read your fair share of blogs, you know many blogs have these cute little Pinterest “Pin It” buttons on all post images when you hover over these images.
If you would like to make your own Pinterest ‘Pin It’ button to use on all images in your articles, then sit back to find out how to do this on PicMonkey (yes I love them and as you know am a professed fan) now.
First things first, I like to match my themes font or at least use a font that works with my blog’s overall feel.

For this reason, I use Dafont, which has in my estimation the best overall amount of fonts to try download and use on the Internet.
Once I have searched, chosen and downloaded a font the fun can begin.
Steps in Creating a Custom Pinterest “Pin It” Button:
1. Go to PicMonkey & Choose “Design”
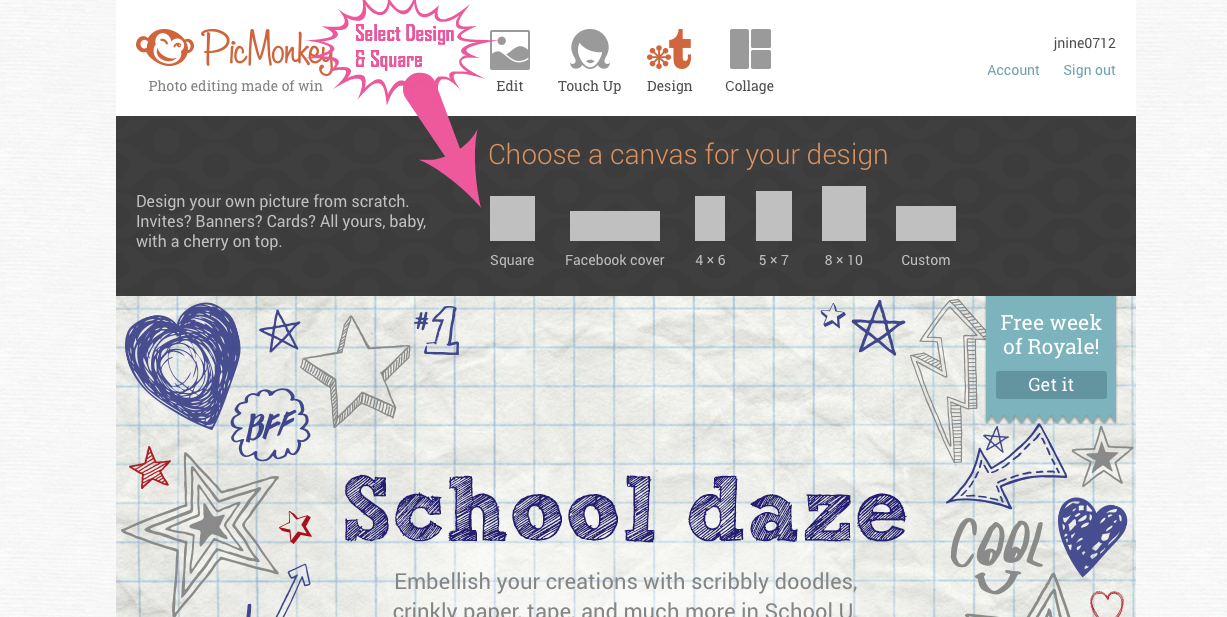
Select Design & Square
2. Edit the Color Code to Match the Color You Want.

Enter Color Code Here
3. Pick the Text You want to use from the text tab and use the “Yours” tab. Then you can indeed scroll down and find the font you want that is on your own computer and font book.

Pick the ‘Yours’ Tab
4. Add the selected text box and type “Pin It”.

Text Pin It Entered in Your Font
5. Make sure to center the text and now use ‘Shape Cutouts in the sidebar menu for Frames with the ‘Heart Shape’. Keep the background transparent.

Use the Heart Shape Cutout in the Frames Menu
6. Now we will make the text color white by using the color code: “ffffff”.

Change the Font Color to White
7. Enlarge the text and put the words “Pin It” on separate lines by entering the “It” text.
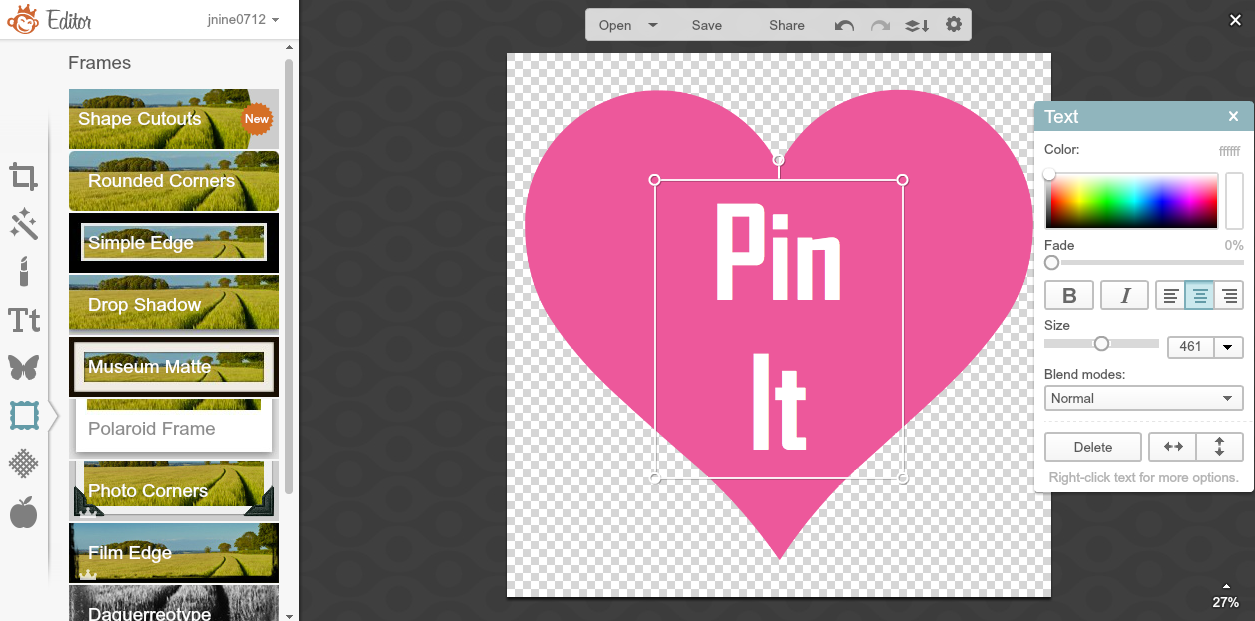
Resize and Center Pin It Words
8. Now Make Sure to Save Your New Custom Pin It Button to Your Computer.

Save Your Custom Pin It Button
Once you have your Custom Pin It Button, you will need to upload the image to either your Blogger or WordPress Blog.

New Custom Pin It Button
How do you do that?
- For Blogger, I wrote an actual tutorial here on how to indeed insert a custom button here.
- For WordPress, you can upload a plugin called, jQuery Pin It Button for Images. I use this plugin myself and it is very easy to set up in the plugin settings, you will need to be in the visual tab to copy over your image URL. Below is a screenshot of how I set the plugin for my custom “Pin It” image up:

Screen shot of jQuery Pin It Button for WordPress
And there you have it, a basic tutorial on how to create your very own Custom Pinterest ‘Pin It’ Button for all your pinnable blog images.


Look how easy you make it 🙂
Aww, thanks Robin and seriously I try to make it as simple as possible and hope that it is for all looking to do this for themselves now 🙂
Great tutorial! I love anything that helps customize your blog even more!
Kim @ HappyPrettyBlog recently posted…Work At Home Mom Earnings
Aww, thanks Kim and so happy to help make that customization that much easier for you and all who want to do this now 😉
My word girl, you are such a wizard at this blogging and you make it look easy enough that I dare even try it! You have a gift for design and thank you for sharing with all of us! Carrie, A Mother’s Shadow
Carrie Groneman recently posted…Fresh Peach Pound Cake
Aww, Carrie seriously thank you for your kind words and I do love designing. I must admit I couldn’t draw my way out of a paper bag with my hands, but when it comes to computer design, I truly can’t believe what a difference this medium does make for me. But still thank you a ton for saying this and for also sharing!! 🙂
Janine,
Thanks for the easy idea to make custom PIN IT buttons. I totally agree with Carrie. You have a gift for designing blogs. You make everything look easy. Have a great day!
Blessings,
Diane Roark
Diane Roark recently posted…Cookie Dough Cupcake & Giveaway
Aww, between you and Carrie, I can’t say enough just thank you for always being so kind to me and just glad I can share here for all (and help) when I can!! Have a wonderful day, too!! 🙂
I LOVE this tutorial and am pinning it in my blogging tips to be able to use it later. I am looking forward to creating my own custom button. Time is always the huge issue for me. Soon, very soon.
Blessings,
Shari
Pure Grace Farms recently posted…Preserve the Harvest Series: How to Freeze Green Beans
Shari, your comment made my day and so glad you can use this. And huge thank you for pinning, too!! 🙂
So cool! And super easy too. Thank you so much for sharing this, Janine!
another jennifer recently posted…Killing Kindergarten
Aww, totally happy I could share and that you can use this, too Jennifer 🙂
Janine, you are sooooo good at what you do! I loved this tutorial. I have pinned it so I can refer back to it as needed. Thank you for sharing it with us at Treasure Box Tuesday! 🙂
Joy @ Yesterfood recently posted…Chocolate Buttermilk Cookies
Thank you so much Joy for pinning and so glad you found this tutorial useful 🙂
Great information. Lucky me I found your blog by chance (stumbleupon).
I have book marked it for later!
bonus de paris sportif recently posted…bonus de paris sportif
Thanks and truly appreciate you bookmarking, too.